Tuesday, June 25, 2013

Finished Quilt Top and New Project Details....

First I have photos of the finished quilt top for the Flower Garden Quilt A Long....This was suppose to be done over many weeks but since we are getting ready to move I needed it done and out of the way.
Here is a sideways view of the top.....These aren't the best pictures, for some reason the gray and pastels do not show off very well....


This will be a mermaid bellpull for in the bathroom, the two mermaids are stitched using the same techniques just different colors for the hair. Both tails are stitched with Pailettes in a peacock color with the torso and face outlined in DMC 310 (black) 

Their hair is stitched using Fly Stitches in two colors with Kreinik #4 Braid and Caron Wildfloers  and a hair strand done in Stem Stitch using a darker shade of Kreinik #4 Braid. 


After stitching the first mermaid I felt the cream background was to plain and took my sons crayons and shaded it in and then ironed it. I really like how easy the crayon goes onto the fabric but I was hoping for a more watercolor affect out of the overlapping areas but they really don't melt together just into the fabric. 

However after Ironong I noticed the mermaids scales had taken on a more rounded look with the colors changing to a more antique look. So now I will have to iron the other mermaid till her tail matches. I'm planning on doing some machine quilting around the edges and then a simple binding. I will also be adding some beads to each girl since the hands look like they are holding something.


Sunday, June 16, 2013

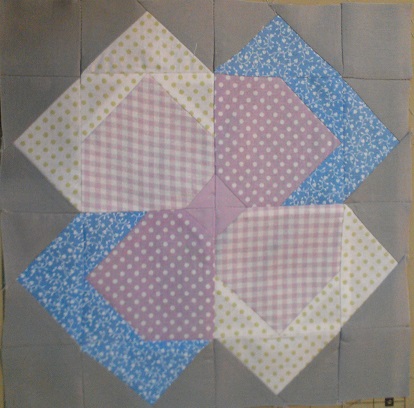
Flower Patch Quilt Long blocks 1-7

I finished cutting out all the blocks and background today although I don't think I got all of it right. I will just have to wait and see how it goes.

Here are the blocks I have finished so far. Of the 17 needed I have 7 done.


Monday, June 10, 2013

What I'm up to today....

 I have been working on a hex quilt for about a month now and I am almost 1/3 of the way done. I'm also working on a QAL Over at http://greenfairyquilts.blogspot.com/ it's the Flower Garden Quilt Along....I will post pics of those squares a little later in the week I am working on them in sections instead of one at a time.

Ok so on to pics......

What the finished hexes will look like laid out
completed hexes (ps...there are 288 in there!)

pinned and ready for sewing

Awaiting pins


Fabric for flower garden

Friday, January 4, 2013

Mirabilia August Peridot Fairy

Pre-Beads and Backstitch

 bead veiw
Complete

Wednesday, January 2, 2013

February Page Complete


Mirabilia Freebie 1997
Beaded Tatting and Cross Stitch
This is for the February page in the Needle Masters Monthly Stitch along

Wednesday, November 28, 2012

January Page For Needle Masters Monthly and Mirabilia Finish

I finished the 1996 Cherub for January page and added a needle tatted bookmark to the page and a few other little trinkets. i still feel it would look better with maybe a border around the Cherub but I can always add to it later.


Also finished the Bumblebee by Mirabilia for inside the front or back covers since there are 12 Cherubs there won't be a free page in my book for the two freebie bugs. I've got about a quarter of the Gold Butterfly finished and that one will also go inside one of the covers.


And I am trying to learn to Tat - I did complete a couple things with Needle Tatting but I am one of those who wants to learn the old-fashioned ways of doing things and so I am working on Shuttle Tatting now. I am super slow and awkward but learning is always that way. Here is what I have done of a Doily that I started yesterday and had to restart about a dozen times before finally getting the join in the center correct.


I'm not totally sure where this will end up but finishing it will be the hardest part!

Thursday, November 15, 2012

Needle Masters 2013 Book Cover Finished

So for next years Needle Master Monthly SAL we needed to have the book cover finished before the end of this year and even though I started out wanting a book of crochet lace samples I have changed that to using the Mirabilia Freebies instead. It works out really well since there are 12 cherubs one for each month. The two bugs will be done as well and will be mounted in the inside front and back covers.

For the front cover I choose to do the sign from Villa Mirabilia over one on 40 count linen. Instead of the beads I used kreinik #4 braid in purple to match the streamers that hang on either side of the banner. Thankfully there weren't very many beads in this section and so it was easy to fudge.

I also made a needle tatted border for around the oval and stitched it down with burgundy hex beads and also white cats eye beads secured with size 15 purple iris beads. It was really nice to be able to use up some of my misc beads.


I also tacked down a few rayon trim lace pieces for interest, all in all I really do like the finished product.

Monday, November 5, 2012

2006 Mirabilia Christmas Tree Finished

Before the beads and Kreinik

I just took this out of the frame after 3 days of beading! It's really heavy, with all those beads I will have to find a really good way to mount it or display it. As you know if you read my blogs I am not into the traditional answer of framing. Therefore I will need to be inventive with this one.


All Done 


I used size B Nimo Beading thread for this and most of my Mirabilia because it comes in about 20 colors so it is easy to match the background linen and it is one of the few threads that doesn't break when you are using Swarovski Crystals. I did have one incident on Peytons Mermaid where the crystal was so sharp that is cut the thread and had to be repaired but this was a very heavily beaded area and I now use a heavier weight Nimo.
Close up of beads!

Wednesday, September 26, 2012

My Masters Book and A New Furbaby!

Ok Business first! I finished my Needle Masters Monthly SAL Book a few days ago and after much debate about what I would put on the cover I came upon an Irish Crochet Butterfly pattern in Crochet Traditions Fall 2012 that will fit perfectly on the front....Here is a pic of the book...
The Cover is Pink and Cream striped silk and my pages are Natural linen. Just in case you are wondering how I put this together...

I cut four layers of silk, two for the front and two for the back, sew around leaving a small opening for turning. I inserted one layer of ultra stiff interfacing into the each of the covers. Then I top stitched around all four sides to close up the opening and make sure it always lays flat.

The pages were made in the same way but cut out about and inch smaller, and no layers of interfacing were used in the pages. After top stitching, I used my handy dandy fabric hole punch/eyelet setter to put in small silver eyelets, two per page. Tied in all together with lt grey organza ribbon and now all I have left is the crochet on the butterfly....


Here is a close up of the bottom section of the wing. I am learning two new techniques so far with this project. Clones knots...Don't really enjoy making these but I do love the effect they make, and the use of Padding Cord. I am working with size 30 thread and a size 10 hook and the padding cord is 4 strands of size 10 thread. 

And last but not least we were blessed with a new Furbaby last night. Very mush by surprise we were given a four month old cat. I do believe he is the laziest four month old kitten EVER. He will only eat while laying in my bed! 


His name is Oskar and he is not real sure what to do about our other furbabys yet but I feel he will eventually except that he has sisters and will calm down....

Oskar


Sunday, September 16, 2012

Needle Masters Monthly SAL

So Me and Mom were talking yesterday and came up with this awesome idea for a monthly SAL for needle workers of all types. I will be mixing in quite a few different styles through the year since my mind changes just about daily on what I want to work on.

The supply list and rules for the SAL will be posted at a later date with the start date being 1/1/13. I encourage anyone to join in on the fun as there will be a drawing at the end for a very hefty prize!!!

Just to give you an idea of what will be going on...

Every month you will make one page to add to your "journal" beginning with the cover and first page due by the end of January. This journal of your needlework may incorporate ANY kind of needle work., Including but not limited to..

Cross Stitch
Crochet
Knitting
Canvas
Needlepoint
Petite Point
Hardanger
Pulled Thread
Bobbin Lace
Tatting
Quilting
Mixed Media
And of course those Fiber Artists out there..

Each month you can pick a theme or designer to showcase or kind of needlework. It is solely up to you. However to be included in the drawing you must complete ALL 12 months of pages. Sending in a photo to the main blog is required monthly.

Basically you are creating a sample book of your needle work. We will post instructions on how to construct the basic book but as far as decorating the pages that will be up to you.

Monday, June 18, 2012

Around the world in 80 stitches- Part One Complete

It's not a great pic but this section is done....I'm one step closer to getting caught up!

Wednesday, June 6, 2012

Hopsalots - Finished


I recently got back into knitting and for those out there that can do more than one kind of needlework I am sure you find yourself torn between types of projects to work on. I am currently designing a blanket to eat up all the left overs from a previous project and I am loving the results so far but ai needed the needles that were in use for my Madge and Padge slippers. When I was younger I had a pair of pink bunny slippers which I named Madge and Padge. I must have had them for at least 5 years and I am pretty sure they are dust bunnies now under furnature at Moms house that will eventually turn up one the these days. So in honor of those favorite childhood slippers I just had to knit up these guiys and finish them to reclaim my needles!

They are felted out of Debbie Stroller Stitch Nation Full O' Sheep, In color Peony. The original Madge and Padge were not quite this bright and way more stuffed but alas these are super cute and warm! The yarn just did not want to felt for me in fact I had to put it in the washer three times to get them to the right size and I have big feet! it was my first fitted felted project so the fact that they fit at all is a blessing! The pattern is available on Ravelry and it's called Hopsalots just in case anyone else is up for a quick and fun project!

Thursday, May 31, 2012

In Progress- 80 Stitches

 I know it's been a long time since I posted anything but It's been a little crazy in Colorado for us lately..

 I've only finished the first heart, so half of the first part is done. I really like the fished product but the stitching instructions gave me some trouble at first so I decided to split it up and do each section at a time.....

And of course my son Dakota at his Continuation today with his buddy Carson....Carson on the left and Dakota on the right. They are continuing from 6th grade into Middle School this year! 

Thursday, April 5, 2012

It's been a month!

Yes a whole month since I posted here! I really haven't done much lately, we've finished moving and I have been working on a few doilies since our new place is very tiny on space. Crochet is the best option when short on space. So here is the first finished doily I made. Done with DMC traditions in White and Ecru.


These photos are a little washed out since I took them at night with the flash. But I can take better ones later.....

Thursday, March 8, 2012

Elizabethan Pin Cushion and Needlebook Finished


I finished the Pin Cushion last night but wanted to wait to take the pics till the sun was up! I am really happy with how this turned out. Since all of the hexes except the top one is lined with plastic it made for a very difficult finishing. Yes, I have a hole in my finger from pushing the needle through but I think it was worth it.There was a few moments there that I was worried that it wouldn't line up at the end. Next one like this that I make will have a different kind of plastic or interfacing or something so the sewing is a bit easier. All in all it is very pretty!
And here is the Needlebook all finished. I am not really happy with how the pages went in as they are not perfectly spaced or centered and they didn't line up on the outer edge and so I had to trim them to match BUT it is only for my use and so as long as it's functional that's really all that matters. I just have to finish the labels for the pages and sew those to the felt and then I can fill it up! Yeah! 

This is also my two finishes for this months WIPocalypse update. Unfortunately I have no clue what I want to start on next or if I want to work on anything started. I do know I am not in the mood for cross stitch today....Maybe tomorrow will be different!


Tuesday, March 6, 2012

The Process Of Wearing A Hole In you Finger!

Yes I how have a hole in my middle finger from pushing the needle through these hexes! They are laced onto the plastic base hex and then ladder stitched together, then couched with gold trim. I think it is going to turn out bigger than I thought it was...the books measurements are in metric and I am not so good at judging the size of things based on cm.

Here are the pics so far! I will be so happy when all the couching is finished, but it does add alot to the design!